Thursday, December 3, 2015

Fixing Shrunken Clothes

I recently bought a couple of shirts that when first worn, I absolutely loved! Then... I washed them. It ruined everything. I hung dried them and followed directions and they still shrunk. 
So, I started searching Pinterest on how to fix them. Most tutorials said to use baby shampoo, and I've got a lot of that! So here is what I did.

In a sink or bucket fill with lukewarm water and a cap full of baby shampoo.
 Place item of clothing in water and soak for a few seconds. 
DO NOT RINSE! 
Then squeeze out water, place flat on towel and roll up.
 Squeeze rolled up towel to get out extra moisture.
Gently tug on clothing in direction it needs to be "un-shrunk".
Lay flat to dry. 


I didn't think about it until it was too late, but I didn't take before and after pictures. So sorry!!
So here's how I thought it worked...
Two of my shirts worked out well!! The other two still have a funny shape... but they aren't as small. Maybe depending on the fabric, or style of clothing effects the outcome. The baby shampoo is supposed to help relax the fabric. 
All in all I think it's a great trick to fix those shrunken clothes! Super easy too. Ill be doing this again. 
So go try it out if you've had the same problem as myself.
Happy fixing!

-Becca


Friday, November 20, 2015

Easy Vegan Brownies


Hello all you beautiful people! Amber here! Tonight I wanted to share with you a yummy, fast, and easy brownie recipe we devoured this evening! Weather you are vegan and in search for a delicious dessert, or just simply "Old Mother Hubbard", and currently out of eggs in the house until your next shopping trip- (that's us!) -  you will love how simple and scrumtious this recipe is! 

Easy Vegan Brownies

2 C flour
2 C sugar
3/4 C cocoa powder
1 tsp baking powder
1 tsp salt
1 C water
1 C vegetable oil
1 tsp vanilla
_____________


· Preheat oven to 350°

· In a bowl, stir together flour, sugar, cocoa powder, baking powder, and salt. Then add water, vegetable oil, and vanilla. Mix until blended.

· Spread into 9x13 inch baking pan.


· Bake for 25-30 minutes. Let cool for 10 minutes before cutting into squares. 

See?! Easiest eggless brownies on the planet! Nom-nom! 


-Amber

Friday, November 13, 2015

Baby Boy Nursery On A Very Small Budget!

    I recently had my first baby over the summer. My husband being a full time student and plans for me to stay at home with Anson, didn't leave us with a lot of money to spend on a nursery. So I had to think outside the box and take whatever freebies I could, and I took a lot!
    Let's start with the basics. The dresser we already had which was nice. It was from Ikea and is a few years old. The crib we got used. It's a vintage Jenny Lind which I love!! $50 for the crib with hardware, and mattress. We didn't have to do any refinishing due to its awesome condition. We used a changing pad on top of the dresser so we didn't have to buy a separate piece of furniture. That pad was from target, with a minky cover off of amazon. (American Baby Company $15) As for bedding, my amazing mom offered to make a crib skirt, quilt, curtains, and decorative pillow. The fabric probably ended up being the most expensive. It's not quite done, but I'll be sure to post the pictures when it is!
    Now for the details! Whenever someone was offering up old decor I tried to take it. So my aunt was getting rid of an old Crate and Barrel shelf with matching picture frames. These were originally pink so I had to refinish them. She also gave me a throw pillow that happened to match perfectly and a lamp base that matched well too. I threw on a cute lamp shade from Walmart and it was compete. A lamp to match the nursery. Basically all for free!!
    We wanted Anson's nursery to be rustic with a cabin-like feel. So i turned to my brother for some deer sheds he had laying around. They added a perfect touch.
    My lovely sisters threw my baby shower, and knowing I didn't have a lot to spend on decor, they decided to make some for the shower that also matched his room. They were included as gifts for me to take home and decorate with. It was awesome!!
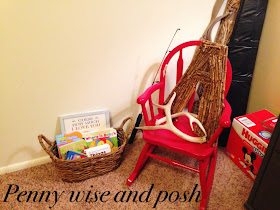
    Here was one of the most fun parts!! I wanted to do a picture collage but not spend a lot of money. I searched Pinterest for woodland printables. I found a few, and with some of our own pictures sent them to Walmart to be printed. I got all the frames from Walmart as well. Some are super cheap to be honest. The most I spent was for the large Remington picture. (Hobby Lobby, 50% off) Then the hubby helped hang them all up. That wall is one of my favorite things! I also used some of my husbands stuff that always ends up in a corner as decoration too. (i.e. Cowboy hat, rope, fishing poles)  Last but not least... I refinished my pink childhood rocking chair.
    All in all, I think it has come together quite nicely, without spending too much money. Now we just need bedding to tie it all together! If anyone has questions on how the decorations were made, or where anything was from, feel free to leave a comment. I'd be glad to answer!


Happy decorating!!

-Becca

Affordable Winter Wedding ideas

Okay, this one is fun! These center pieces and hot chocolate bar were so cheap to do. The rustic yet elegant look is darling! 

First off, the center pieces!
We cut our own wood slabs from fire wood we had out back. Then, with a wood burner, burned sayings into each one. It takes time, but cost $0. 


Next, we got glass candle holders from the dollar store along with cream candles of different sizes. Add a little bit of ribbon, pearls, etc, (with a hot glue gun) to accessorize. Place all of that on a big wood slab. (Again we cut ourselves out back) Super cheap! This was for a wedding so we had a vase of flowers to add to this center piece. Those vases came from the dollar store and local D.I. 


Hot Chocolate Bar! The yummy part!
With this you can add whatever you'd like, but here is what we did.
-We ordered in bulk 3 flavors of hot chocolate. (milk, raspberry, & mint) 
-Marshmallows of course.
-Cinnamon candy sticks  
-Chocolate peppermint dipped spoons. 
-Soft Caramels 
We got large glass jars from Walmart for the hot chocolate. Add decorative spoons for serving, fancy labels attached with ribbon, and they are complete!! 
Dip spoons in melted chocolate of your choice with sprinkles, peppermint, etc. cute for displaying.
We bought white hot drink cups, plain cup sleeves, and with stamps, stamped the bride and groom's initials with a "Thank You" on each sleeve. The venue actually provided large drink dispensers with hot water. 
This idea is so fun for winter weddings! You could even do this for  Christmas parties, birthdays, or whatever else you choose. Who doesn't love hot chocolate during the cold winter months? We sure do and this was so fun to have at the wedding as guests left on their way! 


(Photography: Courtesy of Green Apple Photography)

Hope you enjoy!
-Becca 


Breast Feeding Tips & Tricks

    I know everyone has their opinions on breast feeding. Some are good, some bad. I am no expert on the topic, but I thought I'd offer up my experience and advice for those who may struggle like I did. Over time you learn what works best for you. In my experience I had no clue how hard it would actually be. I wanted to breast feed and had that goal from the beginning but who knew I would struggle with it. Out of all the ups and downs of pregnancy, birth, etc., this was the hardest thing for me. I hope my thoughts and advice can help whoever is willing to read this.
     Right after my little guy was born I was anxious to try and nurse. Within an hour or so I asked the nurse to help me and try it out for the first time. It is not an automatic thing. It felt awkward and unsuccessful. I just thought, okay I'll try again a little later. The nurse in the hospital offered me a nipple shield for help. It sure helped him latch on so I started using it every time. For the first day I thought I was doing great. We would "nurse" for about 30 minutes. Little Anson would suckle almost the whole time so I thought all was well. Then... The lactation specialist stopped by my hospital room for pointers. When we got talking and she took a look she brought to my attention that basically no colostrum was coming out. I was sadened at this. We then had to supplement. That was really hard, time consuming, and not ideal for me. So.. When I got home I immediately began power pumping in hopes that my colostrum would come in. GUESS WHAT?! The very next morning I was engorged and it had come in. I was really excited!! But the down side was little Ans wouldn't latch on without the nipple shield that I was still using. I would get frustrated without it. It became a crutch but I didn't want to use it forever!! Then of course my nipples cracked, bleed, I got a horrible sore on one, and it just wasn't too fun. Then my wonderful mother introduced me to the nipple SHELL. A lot of people get these confused. The shell is a hard plastic, half circle type of thing that goes around the nipple to help draw it out so baby can latch better. I saw them and couldn't imagine wearing them under my bra. But I did it. Within a couple hours it had worked. My nipples were more drawn out and Anson started latching on. I wore them for about a week. I was so relieved.
I then had another problem. One breast seemed to do great when the milk came in. The other, not so much. I would pump and one was white like milk with a couple ounces. The other was less than an ounce and still golden like colostrum. (The one breast was always bigger than the other!) Anson acted hungry ALL the time until we would give him a little formula. I was so frustrated and discouraged. Some days I wanted to just call it quits and do formula instead. But... I kept trying every day. It was a struggle so many times and so annoying honestly. With patience, and constant prayer to be truthful, it ended up working out and now my little guy would rather nurse over anything else. He loves it!
    My mom recently asked me what advice I would give a first time nursing mom. I replied in saying, have patience!! It can suck at first and be really frustrating. But it's supply and demand. If you stop, or supplement often your own supply will decrease. If you keep trying and give it 100% it will get easier! It took me about 2 months before we both had in down and didn't need any assistance from any equipment. I stressed all the time over if he was getting enough too. But trust me when I say... Keep trying and it will happen! It will become natural and routine.
My number one tips:
1. Don't use a nipple SHIELD for latching purposes.
2. If you have latching issues use a nipple SHELL
3. PUMP, PUMP, PUMP if your colostrum/milk hasn't come in
4. Use nipple creams for the cracking and tenderness
5. It's supply and demand, keep at it!
5. Keep trying, give 100%, and have patience! It will get better!!
6. Don't be embarrassed of breast feeding, or asking for help, its dang hard! 

I have attached some pictures of the things I used. Hopefully this post will help some with their struggles too!!


Until next time! -Becca   

Tuesday, October 20, 2015

Gel Nails on a Budget

Who doesn't LOVE a nice set of polished nails that doesn't immediately chip off the next day? Chipped finger nail polish has always driven me nuts! I loved going to the nail salon and getting shellac or gel nail polish because it always lasted so long. Eventually I couldn't keep spending 20-30 dollars every 2 weeks to keep up on it. That's when I heard about the Red Carpet LED Gel nail polish. A coworker told me about it so I decided to do some research and check it out. I ended up getting the starter kit which came with your LED light, prep coat, base coat, one color, top coat, purifier, remover, and cuticle oil. 

Here is what I got...

http://www.ulta.com/ulta/browse/productDetail.jsp?productId=xlsImpprod3950155

I purchased mine at Ulta Beauty and used a 20% off coupon so it wasn't a bad deal at all!! I LOVE it and its become an addiction! It lasts up to 3 weeks on my fingers and longer on my toes! At Ulta one color is $10 and then I'll use a coupon. Either $3.50 off or 20% off, whichever I can find. 
Recently I was asked to try the shellac on the press on falsie nails. This was to add a little length and shape without full on acrylic. I purchased a 50 pack of nails with glue off of Amazon. They were a round tip so we could try a subtle stiletto shape. I paid $7. 
So, I did them just like you would a normal nail. Filed real nailed, glued on falsies, filed and shaped tips, and filed the top to rough it up for polish to stick. The shellac actually looks AMAZING on the falsies. Perfectly even and shinny! 

I love the pointy shape, but personally wasn't used to the length so I trimmed them down. I am really liking them! They add some length and strength. Get an expensive manicure look for much less! We sure love it over here! 

Until next time!
~Becca~


Monday, October 12, 2015

DYI Hocus Pocus Spell Book - Part 2 : Creating the "skin" on your book!


Now that you've made an eyeball... tutorial: HERE, you're ready to move on to a HUGE part of what will make your book have that creepy realistic human flesh bookcover! I have seen many people try to re-create this book, and it always looked so complicated and expensive! Naw... not for me! For this version, you'll only need your big ol' book you'll be using, along with 3 other items! Here is what they are: 


I prefer the paper towel with little dot indents. I loved the way it created texture, almost like pores. (gross, huh?!...but awesome!) 

Prior to creating the skin, attach your eyeball to your book. I used hot glue. Look to a photo of the original for proper placement and a good location as to where it should be placed:


Be prepared to get MESSY. Wear an old T-shirt you don't care about and literally just DIG IN. This is a very hands on craft, and by hands on, I mean you're going to be playing/creating like a toddler does while fingerpainting in preschool--  dipping your hands and paper towels in mod podge and ripping and molding the "flesh" to achieve the desired look! Dive right in and get messy!

Take a pencil, and while looking at a picture of the original Hocus Pocus Spell Book, do a rough sketch of where you want each flesh-piece to meet up to be stitched. There are different sections... like a patch work quilt. 


Start ripping pieces of paper towel, and getting them somewhat damp with Mod Podge. I poured the Mod Podge in a shallow bowl, and used my coated hands to "dampen" each piece. Follow your pencil sketch. Don't worry if your paper towel pieces don't match the shape of each section. This is where you'll scrunch, roll, or pinch the excess paper towel along the edges of each section to create those dips and crevises and valleys where the setions are supposed to be sewn together. 


Layer your paper towel pieces, creating an uneaven ripply skin. Remember, don't be scared to get in there with your hands and form the sections the way you want. Layering, smoothing, and bunching the edges. 

While forming your skin sections with your paper towel, when you're ready to create a "lid" for your eyeball, just rip smaller pieces of paper towel, and fold. Layer folded pieces above and below the eyeball creating under eye creases. (You, can see the eye creases in the photo below.) 


Next step is the outer spine/edge of the book. At this point I was running low on time and didn't put more effort into this area... and now I regret it! I wish I would have taken the time! The original book looks like sewn on fingers! I bypassed that, and simply Mod Podged rectangle pieces down the spine as shown below. If you decide to create a more authentic look, I'd love to see!


Once you've applied all of your paper towel to achieve your desired look, let it sit for about 15 to 20 minutes. At that point, the paper towel might be dry to the touch, but still "soft". Take a pen, pencil, skewer, or other object with a slightly pointy end for this next step. Using the pointy tip of your "tool" of choice, follow the ridges that create the crevices between each section and indent little holes into the soft paper towel. Since the Mod Podge is setting, but not yet hardened completely through, the indents should be easily made, should stay put, and dry that way. This step is to create realistic but "false" stitching needle holes in the "skin". Take a look at the close up photo below for reference:


There isn't a right or wrong way to achieve this creation! Just have fun, get messy, and make something awesome while pinching those pennies! 

The next steps to making your own Hocus Pocus Spell Book are coming soon, so keep sharing and watching! We'll be discussing the paint, stitches, and making your "metal" hardware for the book! 


Thanks for visiting!

- Amber


Saturday, October 10, 2015

Fall cuteness on a budget! (Old Navy fall sale loot!)


Old Navy Fall 2015

So, I am not one to have/use credit cards.  Especially store credit cards.  One year for Christmas my husband and I were shopping for presents at Old Navy.  They had a huge sale going on and we could receive a huge discount on top on what we were already saving just for applying for their card.  So we thought why the heck not, I probably won't even get approved.  But I did, and we walked out of there with over $200 worth of clothing for only $78!  A few weeks later my Old Navy credit card came in the mail. 
Now like I said, I never use credit cards and had no intentions on using this one.  I have always struggled not to buy something when it's on sale.  But, I have needed to learn to change my spending habits with a growing family while still feeling like a stylish mom.  So, with that being said, I do use my Old Navy card on an occasion when I know I have the money in my account to pay it off in full, and when they have special sales just for card holders.
A couple weeks ago they had 40% off the whole store, even items on the clearance rack just for card holders!  So I packed up the kids and went shopping! (I was in desperate need of Fall clothing.)
Here are some outfits I bought for under $90 all together! Minus the shoes and some of the pants. :)


I literally got this denim dress for $9! It was a summer dress on clearance.  Just add a cardigan, leggings, and/or boots, and you have a fall/winter outfit! 

I love love black! I think it's classic and slimming! The shirt and jeans are what I bought during the sale.  Pair with some items already in my closet and I have a whole new outfit.  I love tank tops and short sleeved shirts even in winter because you can add cardigans/jackets and they can also transition to spring clothing. 
 
This shirt is so soft and flattering! Plaid is really in for fall as well.

You can pair this tunic top with super skinny jeans like I have here, or its long enough you could even wear leggings and tall boots. This shirt came in lots of colors if navy isn't the color for you.  


Now, I'm obsessed with fitness clothing right now! I am a mostly stay at home mom, chasing kids, running errands, etc.  Being comfy on a daily basis is a must for me.  These items weren't on clearance already, but I did receive the 40% off. Making them about $37 for the hoody and yoga pants.  That's not the best deal I've gotten, but really cheap compared to a lot of other brands, and I loved them! 


The inside of this hoody was so soft! I loved the neck on this piece as well.  It also has some cute zipper details on the side.

2 thumbs up for Old Navy, and card holder promos and discounts!

Looking classy While budgeting IS possible- and very rewarding!

Until next time!

-Megan

Lovely Lashes

Lovely Lashes


Who doesn't want long, thick, dark lashes that are their own?  I have put some lash serums to the test over the past couple years, and now I can give you the verdict! My own lashes have always been lighter and not really noticeable without mascara.  So without makeup, I literally looked like I didn't have any!  A few years ago, I tried the whole eyelash extension thing.  I probably had them for 4 to 6 months.  Now don't get me wrong, the lady I went to was fabulous!  And I loved the way they looked, how it saved me time getting ready, and that if I didn't have time to get ready, I still looked decent.  It was roughly $120 for a set and $60 every 2 to 3 weeks for a fill.  (Obviously prices range depending on where you live and who you go to.) But with my budget, it was a little more than I wanted to pay for and keep up with long term, especially after having babies.


  So, I decided to try something else.  I have worked in a plastic surgery clinic for the past 8 years and had the opportunity to get products we carried at a discount.  I decided to take advantage of this, and I bought Latisse (which is an Rx).


I used it for about 2 years!  And it definitely worked! It took about 6 weeks to start to notice a difference, and about 16 weeks to get the full benefit.  My lashes were darker, longer, and thicker! My lashes got so long it bothered me to wear glasses because my lashes would brush the lenses!  But again, it became too expensive, even with my discount.  Another downfall was that you had to use a new brush every night per eye to use the product correctly.  Latisse ranges in price depending on what clinic or pharmacy you buy from. 
After I had my son about 7 months ago, my lashes became shorter and started to fall out.  This also happened with my first pregnancy.  I really wanted to try something to help my lashes grow back. I messaged some friends on facebook, and through the grapevine heard of a product called GrandeLash-MD. 


You can find this product at Peerless.  I went to my nearest Peerless location and picked up a bottle.  The employee I talked to said it was wonderful and swore by the product.  I was so excited to use it! It was very easy to use.  Every night after you do your nightly skincare routine, you just swipe it across you lash line like applying liquid eyeliner right before bed.  Just swipe and done!  It took me only 2 weeks before I started noticing my lashes growing! (I'm sure this timeline will vary for every person using the product. This is just my personal experience.)  At about 6 weeks my lashes not only grew back, but they were soo long, and darker!  I even had people ask me on a few occasions if I was wearing false lashes! The best part is that it was less than $40 and lasted me 3 months!!!! How crazy is that! I would say it is definitely worth the money! Everything I tried for lashes worked for sure.  But a lot of us would love to have budget friendly options that still work. This is definitely one of them!